The retouching tools of GIMP: clone and Heal
With the two retouching tools cloning (shortcut key C tool-Icon, stamp) and Heal (keyboard shortcut H, tool Icon patch), transfer to the selected image information on a target area in the photo. In Portrait retouching, you should prefer to Heal, because it also takes into account the structure and brightness of the target area. For a natural correction, for example, of skin blemishes, proceed as follows:
- You zoom in first, in the area of recording you want to correct. Simply press on the "+".
- The best tool for the "Cure" can be found in the GIMP tool box, or via the menu "tools" -> "brushes". In the tool options, choose a soft brush. The size of the brush tip depending on the necessary correction that you make. In General, a Radius of 40 is suitable.
- Now, drag with CTRL key to move the Cursor in the image. You will now see a crosshair with a "clean" area of the skin can choose. This area should be as close as possible to the touch up to the body, so that the structure and brightness are as similar as possible. You have found a suitable spot, mark it with a mouse click. Release the CTRL key. in the image, the source area of the correction remains marked with a cross.
- You can now transfer the selected structure of the skin to the target area by clicking with the left mouse button click on the points to be corrected, the skin.
- It is often useful to choose different starting points for the correction. To do this, repeat steps 3 and 4.
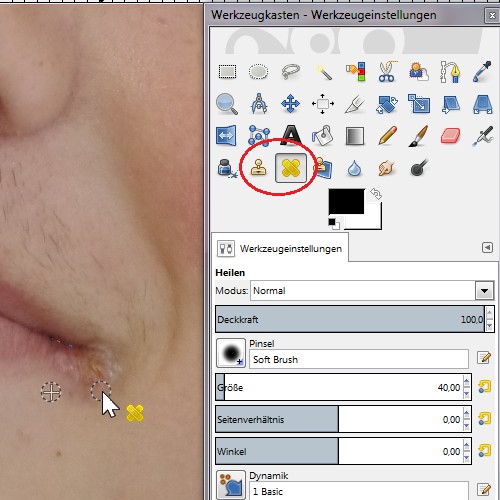
So you can retouch Skin defects
Skin like Velvet and silk With Gimp Shine your Portrait photos
The entire skin should work image is smooth and gentle, you can work with GIMP Filters. This step requires the use of the layers Dialog of the GIMP.
- Open your Portrait and duplicate it in the layers Dialog. This is best done with a click on the corresponding Icon below the layers Dialog. With the layer copy you are working more now. So make sure that this layer sets in the layers Dialog, shown in blue, and therefore active.
- Select from the menu "Filter" -> "Improve not remove" -> "patches". In the Filter settings, the checkmark is missing in the case of "Adaptive" and "Recursive", the Radius of the Filter 16 are located. If you specify the threshold value for Black, with 8, the threshold value for White with 245, to stay the brightness and contrast of the base photos.
- The Filter operates on the entire image, which results in the area of the hair and the eyes to unwanted results. You can expand therefore, the soft-drawn level via the menu "layer" -> "mask" -> "add layer mask" to a layer mask. In the pop-up menu of the Dialog, select Black (full transparency).
- You can set the parts of the level freely, which should be drawn on the Portrait soft. For this, use a soft brush (brush size of 150 px) and paint with White on the layer mask. Corrections to bring you, by connecting to it with Black the original state. For a natural result you have to draw with an opacity of 70 to 80 percent.
- To conclude, you add the levels from the menu "layer" -> "Newly Visible" and save the image. You want to your image in GIMP Format .xcf store, you have to choose since the GIMP 2.8 release, the command "Export".
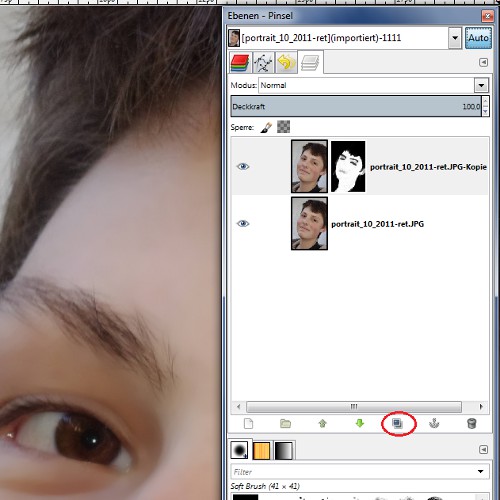
Duplicated layer in GIMP
The eye-catcher of the impressive Portraits are bright eyes
Not without reason the eyes are called the mirror of the soul. Therefore, you should not focus your portrait shots only on the eyes, but also with the means of the image processing highlight.
- Sharpen you Improve your Portrait via the menu "Filter" - > "" - > "Unsharp mask". The GIMP-default values you can accept.
- With the tool "Dodge," put the accents in the eyes. They are bright, and the White in the eye with the tool's settings "on Dodge" and "highlights". You work with a soft brush, the size of which corresponds approximately to the pupil in the image.
- With the same tool, you can darken with "burn" and "shadow" the pupil and eyelashes.
- Finally, you apply as in the preceding step, a layer mask. With a white brush, you get the edited picture elements, and transferred into your Portrait.

"Dodge": accents
This tutorial is based on GIMP Version 2.8.6. The free photo editing software can do a lot more. How to get your photos in HDR enjoy, we will show you in this practical tip.


