Fascinating Text - the Tesla effect with Gimp
Little flashes, like in a Tesla coil you will miss your Text with a few simple steps in Gimp. For ease of Build we have in the gallery , the individual steps are summarized below.
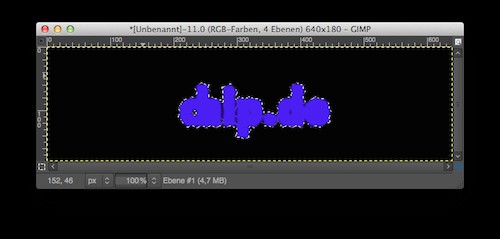
- Create a new image with a black Background. In our example, we have chosen the size is 640 x 180 px. The following settings are adjusted to this size. Write your Text with a text size of 75 px, and the font color to white.
- In the next step, you will create a new layer and fill it black. Open the menu "Filter -> Distort -> mosaic" and set the values according to the Screenshot in the picture gallery a.
- Now switch back to the Text layer and click with the right mouse button to open the context menu and the "selection from Alpha channel" button. Via the menu "selection -> Expand" expand the selection by 3 px and dazzle, then "selection -> Hide" to 5 px. Then go to "selection -> Invert".
- After they are thus changed to the mosaic layer, you can delete it via "edit -> cut" the selection.
- To bring a bit of unrest in the mosaic, navigate to Distort "Filter - > - > PIP". As a setting, you can select "edge smoothing", "Horizontal", "Folding" and "sine". The period should be 15, the Amplitude is 2 and the phase shift 0. Confirm the setting and repeat the PIP Filter, but this time set it to "Vertical" instead of "Horizontally"..
- Still on the mosaic-level select now in the context menu "selection from Alpha channel". Now create a new layer, set the foreground color to #4800ff and fill the selection with "edit -> with FG color fill".
- You can disable the selection using "select -> Nothing," and apply "Filter -> blur -> Gaussian blur" with a value of 11.
- Go back to the mosaic level. There, navigate to "colors -> color to alpha" and select black. So the white lines remain. In the menu "colors -> curves" select the top left “Alpha” and apply the curve after the presentation of the Screenshots on the image.
- In the layers window, click on the lock next "level". Choose as foreground color #00baff, and go to "edit -> With FG color fill". Important: Uncheck the "Alpha channel lock"Icon again.
- Now duplicate the mosaic layer, move the layer under the Original mosaic level, and draw in Illustrator with the "Filter -> blur -> Gaussian blur" with a value of 11 soft.
- Now you need to change the layer modes. You make the mosaic and the color level on the "mode Anwedeln".
- The mode of the duplicated mosaic-level change to "Hard edges" and duplicate this layer three times. Finished the Tesla effect.
Electrifying Tesla-Text
Next, we will show you how to make your Text in Gimp with flames font spice it up.
Latest Videos
The white font on black Background is the starting point.
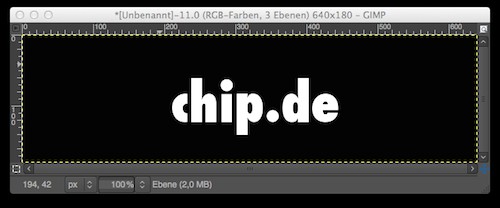
The white font on black Background is the starting point.
Here you can see the settings for the mosaic Filter.
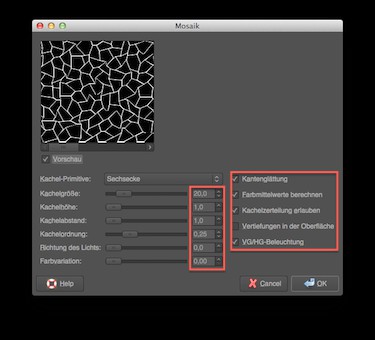
Here you can see the settings for the mosaic Filter.
So the mosaic should look to Remove layer after the step"".
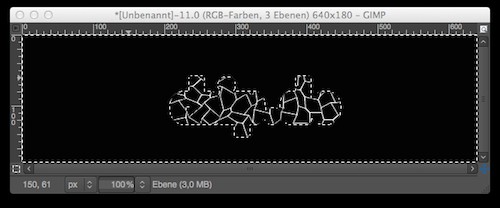
So the mosaic should look to Remove layer after the step"".
The PIP-Filter provides the necessary agitation to the mosaic.
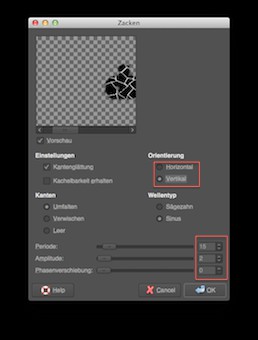
The PIP-Filter provides the necessary agitation to the mosaic.
The Alpha channel selection is filled with color.
The Alpha channel selection is filled with color.
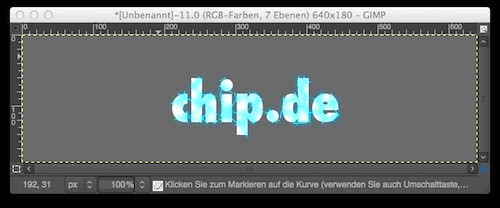
The Background is colored in gray. The Tesla effect is better later.
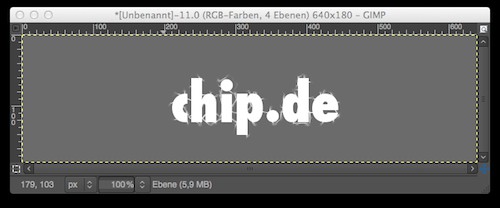
The Background is colored in gray. The Tesla effect is better later.
The curve tool makes this setting the lines more angular and reduces the number of semi-transparent pixels.
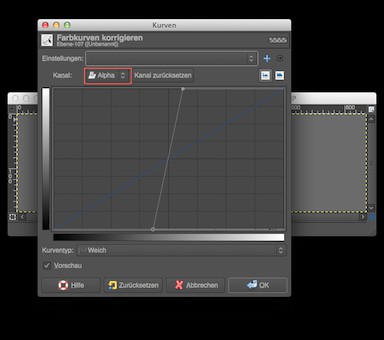
The curve tool makes this setting the lines more angular and reduces the number of semi-transparent pixels.
With locked Alpha channel, you color the lines.

With locked Alpha channel, you color the lines.
With changes in the levels of the modes you will receive the finished Tesla effect.

With changes in the levels of the modes you will receive the finished Tesla effect.


