Photos with a spirit level to straighten in Adobe Lightroom
- From the look in your Lightroom library, the image that you want to straighten and go into the "Develop"mode.
- You go in the right-hand menu-bar under the Histogram on the left icon "crop overlay". Alternatively, you can press the [R] button on your keyboard.
- At the point of "angle" is now the Begradigungs tool. To Align your image, you have several options:
- If you have a horizon or other straight lines in the image, which can be used as a reference, you should make use of the water balance. Click on the yellow water cart icon. Then drag with the mouse a line along the horizon in the photo. Lightroom will rotate the image so that your previously drawn line is exactly horizontal.
- For fine tuning, or pictures without the reference lines, you can now proceed with the mouse pointer on the gray area directly next to your picture, so that the pointer icon turns into a curved arrow. By Pressing and Moving the mouse, you can rotate the image until you are satisfied with the result.
- Then click on "Done". The Changes you can make in Lightroom at any time, or to further customize.
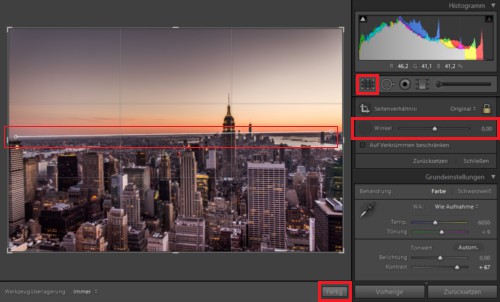
Lightroom: images in straight line
The large Workshop in the CHIP Academy: Lightroom perfectly in the handle
With the price of the CHIP Academy from Lightroom-beginner to professional: you will Learn how easy it is to achieve with the built-in image processing first results quickly and how you organize your photo collection.
- In 3.5 hours you will learn how to correct image errors by batch processing, effective and impressive HDR serial with Lightroom combine.
- Visit the CHIP Academy and get it for 19,90 euros the extensive Video Workshop in the Online Stream.

Adobe lightroom pictures to straighten
These instructions are based on Adobe Lightroom 4.4 on Windows 8.1. As you are in Lightroom compare view for edited and unedited images, we show you in our next practice tip.


