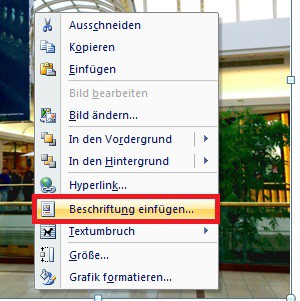
Graphics prepare in Word for the picture directory
So that Word can put together your graphics, and the graphic descriptions to the directory, you must rename each Element as follows:
- Click on the graphic with the right mouse button and select "insert caption".
- Under "designation" you can now choose between "figure", "formula", and "table," or enter a term.
- In the field "label" to name your figure in more detail, for example: "figure 1: Screenshot of CHIP.de, may 2014". Then click on "OK".

List Of Figures: Figure
- The image and the image signature, you may move in the Word document, and customize your Layout.
Illustration of directory to create image signatures
The work is written is done and each image in the right place, you can insert the figure directory. This position is either below the table of contents or in the notes.
- Click on the location in the document where you want to insert the directory.
- After this, navigate to the menu "references" and click in the "labels"box on the "picture directory".
- Under "page view", you see a preview. All of the Changes, for example, Removing the fill character will be displayed here.
- Finally, click on "OK" will insert the table of figures in Word.

List of figures in Word
How to make your table of contents in Word to format correctly, we will show you in a further practical tip.


