Wi-Fi Profiles in Windows 10, 8, 7 and Vista-delete
- Simultaneously press the keys [Windows] and [R], so that the window "Run" opens.
- Enter in the input field "cmd" and click "OK". Now a black window will open.
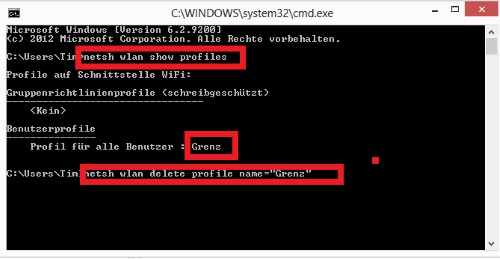
- Type in this "netsh wlan show profiles" and press "Enter".
- You will receive a list of all the networks to which your Computer was already connected (see image).
- Now enter "netsh wlan delete profile name="XXX"" in the text box. The characters XXX are in this case, the name of the network, which you have read before and now want to delete.
- Now press again "Enter" will delete the wireless profile. Now perform again the query "netsh wlan show profiles", it should no longer display the deleted profile.
- Note: to avoid potential problems when you delete, you should disconnect from the current Wi-Fi Connections.

Windows WLAN delete profile
Windows 10: Wi-Fi-delete Profiles
Note: The above instructions also work on Windows 10. This alternative guide for the latest Microsoft operating system, but is a little simpler.
- Open the Start menu in Windows 10 and select the "settings".
- Under the category "network and Internet" the left, switch to Wi-Fi.
- Scroll if necessary down a bit and click on the "Wi-Fi settings to manage".
- Below you can find all the known networks. Select the desired and click on the Button "save".
- All information on this Wi-Fi profile will be deleted. You can connect afterwards.

Wi-Fi profile on Windows 10 delete
In the next practical tip we show you how to a Wi-Fi HotSpot in Windows 10 create.


