WordPress on the PC install the - Server-requirements
WordPress requires for its function a web server with PHP, MySQL and Perl environment. This precondition is not given in a Standard Windows System. The easiest way to create the necessary working environment, is the use of XAMPP. This is a Distribution of Apache (the web server), MySQL (database server), PHP and Perl (scripts / applications), which is also install for a novice user is relatively easy to.
XAMPP is available for Windows, Linux, Mac OS X and Solaris available. The current Version is available here.
- Download the latest Version of XAMPP download (recommended for beginners the Installer Version), and it will start the Installation.
- The XAMPP Setup wizard guides you through the Installation. In the window "Select Components" you can customize the Installation. If you are not sure about the meaning of the components in the Clear, let the sake of simplicity, all enabled. The target directory you can choose freely, it is safest to use the proposed.
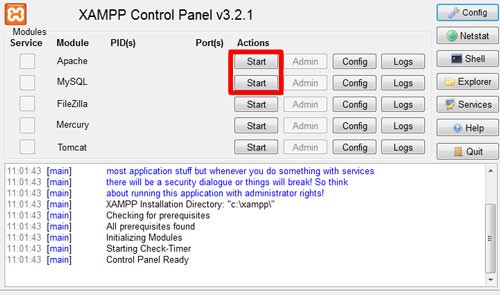
- After the completion of the Installation, the XAMPP Control Panel starts. If you have previously collected with the Administration of a web server is no experience, it is sufficient to use the basic configuration of XAMPP. Click on the Start button for "Apache" and "MySQL".
- Depending on the configuration of your system, it is possible that an active Firewall will ask the approval of the web server and database service. If your Computer is in a local network and you want to access from other computers to the web server, you need to allow access. You use the web server only on the Computer on which you have installed it, you do not need to grant the access.
- On the XAMPP Icon in the notification area (to the right in the task bar with the clock) by right-clicking a small control menu to have the Server disable or enable.

XAMPP Control Panel
WordPress on the PC to install - create database
- Open a web browser and type in the address bar "localhost".
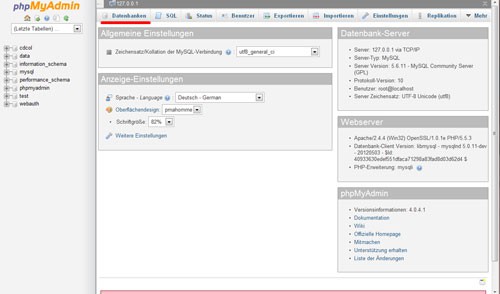
- Select your preferred language and then under "Tools", select "phpMyAdmin".
- Click on "databases".
- Under "create New database" enter a database name of your choice. In the drop-down field "collation" select "utf8_general_ci". Click on the Button "Create".
- Click in the left column to the database which you have created just now.
- Now click on the Button "rights" and then on "add user".
- Enter your user name.
- Under "Host" select "Local" if you only want to access from your computer to the database. Select "Any Host" if other computers in your network access to the database is to be made.
- Assign a password and check whether it is in the line "database for user" select "Grant all privileges on database [database-Name]" is selected.
- Finally, click on "OK".

Database management with phpMyAdmin
WordPress on the PC to install The WordPress Installation
- Download the latest Version of WordPress down.
- Unzip the zip file and copy all the files in the Document Root (the document directory) of your web server. You have used when you install XAMPP, the default path is the document directory: "c:\xampp\htdocs\".
- Note that this directory already contains files from the XAMPP Installation, which will overwrite part of it. You can use this (copy to the directories "forbidden", "img", "restrictedt" and "xampp") in an any-to-create directory, or delete it.
- Alternatively, you can install WordPress in a new directory - then you need to change the following enter the path accordingly.
- Now open in the web browser to the address "localhost/wp-admin/install.php".
- A message appears that the file "wp-config.php" does not exist. The easiest way to create this file, in the Browser the Button "Create click on the configuration file".
- The configuration is normally, easily, make a note of Alber sicherheitsb however, the information above is in bold notes and click on the Button "get started".
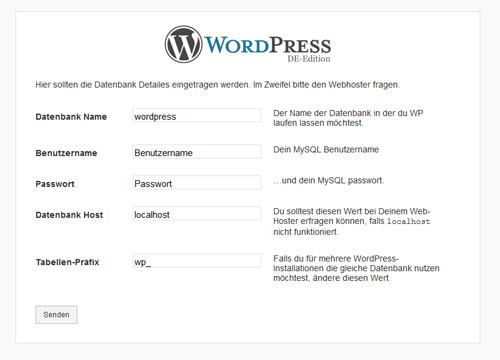
- In the input mask already existing entries, you replace it with the name you have assigned and your password. The entry "localhost" for the database Host, you should not, however, untouched, since WordPress find the MySQL Server. Click on "Send", if you want to continue with the Installation.
- Now click on the Button "run setup".
- Enter a relevant title for your Blog and for the user "admin" with a password. You can later add more users and authors for the Blog.
- Enter a valid e-mail address.
- The local WordPress Installation, a preview environment can be used, before the Blog is later transferred to an Internet web server, you can click on the Option "privacy" already now, so your Blog can later be found by search engines.
- Finally, click on "install WordPress". The Installation is now done and you can log in in WordPress.
- Your new Blog directly and without registration call, enter in the browser address bar "localhost".

WordPress Installation
Note: The presented configuration of XAMPP is suitable for use in a network, especially the Internet, is not secure. XAMPP according to hedge, please read this information.
An Overview of the ten most popular WordPress Plugins to get you here.


