Installation of the Ubuntu Firewall UFW
- Since the "Uncomplicated Firewall" is included in the default installation of Ubuntu, you can install the package get very easily via the Terminal command "sudo apt-get install ufw". This is the normal command-line-based UFW Version installed.
- You want to use the Ubuntu-Firewall is a graphical user interface (see below) and not with the Codes, you can use the command "sudo apt-get install ufw gufw" to install the GUI for the UFW. In particular, for inexperienced users it is recommended.
To configure UFW via Terminal command line
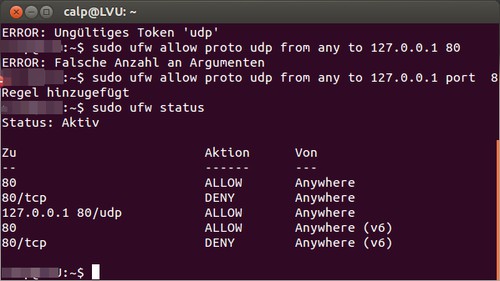
- "sudo ufw status" gives the current Status of the Ubuntu Firewall. The response line "Status: Inactive", then you must start the Firewall in the first place.
- "sudo ufw enable" is activated the UFW as a service on Ubuntu. So the Firewall is running even at the start of every program with. You want to disable the UFW again, use the command "sudo ufw disable".
- "sudo ufw allow|deny|reject SERVICE" is the simplest Syntax, with the new UFW-allow to configure rules. On "allow" to allow the respective Service, via "deny" and "reject" to block the network traffic of the Service. In the Latter case, the sender of the packet receives a notification that it was blocked. All Services are included in the file "Services" under "etc/", for example. ftp, http, or pop3.
- "sudo ufw allow|deny [proto ] [from [port ]] [to [port ]]" is the General Syntax, special Firewall-configure rules. About "proto" is defined in the Protocol, i.e. UDP or TCP. On the "from" is used to declare the sender's address and Port. The destination address is set via "to".
- As the value for each Parameter can in principle be set to "any" to show all possible values (IP cover addresses, Ports, protocols). A possible rule about "sudo ufw allow proto udp from 123.454.12.01 port 80 to any would be" - This allows the UDP traffic of the specified server address with the Port 80 to any destination address.
- "sudo ufw allow/deny [port]/[proto -]" allows/denies the network traffic of a specific Protocol for a specific Port. Example: "sudo ufw allow 21/tcp" is configured, all TCP-accept packets coming in on Port 21, regardless of destination address or sender address.
- "sudo ufw default allow/deny" defines the entire network traffic on the Ubuntu-Firewall. You can set the value of "allow", be accepted in principle all of the Compounds. The UFW would work in the case, such as a Blacklist, allowing you to block only what needs to be blocked. Recommendable is but to ban the entire network traffic package with "sudo ufw default deny", only the necessary Services, Ports, and addresses to share.
- "sudo ufw logging on/off" (de-)activated the Logging function of the Ubuntu-Firewall. You set the value to "on", i.e. it is co-written all of the actions of the UFW.
The easy configuration: Ubuntu Firewall with GUFW
Latest Videos
You type in the Dash "ufw", the application will see "Firewall configuration" with a white-and-blue Icon. With one click, then start the surface of the UFW.
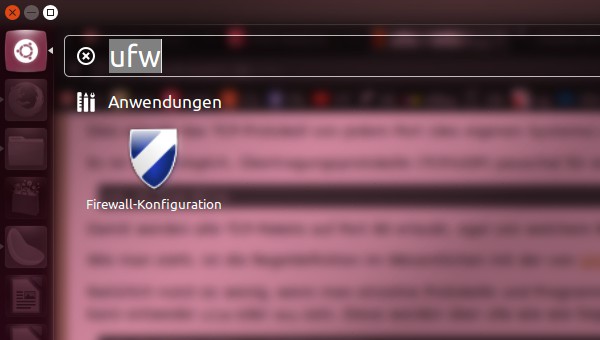
You type in the Dash "ufw", the application will see "Firewall configuration" with a white-and-blue Icon. With one click, then start the surface of the UFW.
First, you have to log in with a click on "Unlock" with Root-Rights. After that, you enable the UFW, by setting the "Status"switch.
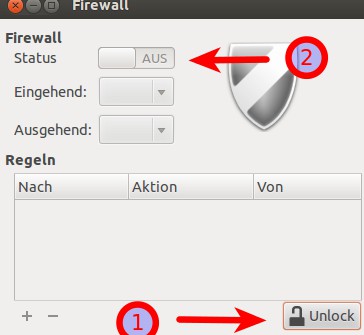
First, you have to log in with a click on "Unlock" with Root-Rights. After that, you enable the UFW, by setting the "Status"switch.
(1.) Here you can set the global Firewall settings for incoming/outgoing Connections. (2.) On "+" to add a new rule, using "-" to remove an existing one.
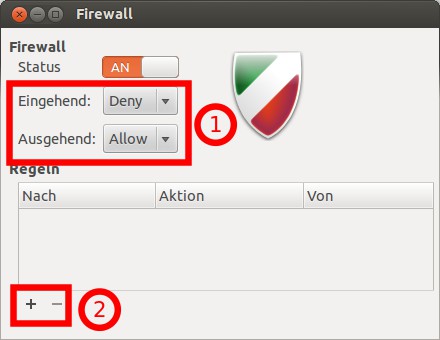
(1.) Here you can set the global Firewall settings for incoming/outgoing Connections. (2.) On "+" to add a new rule, using "-" to remove an existing one.
Under "pre-configured", you can configure Firewall rules for some Standard applications and Services. In this example, incoming Connections from "Skype" are accepted generally.
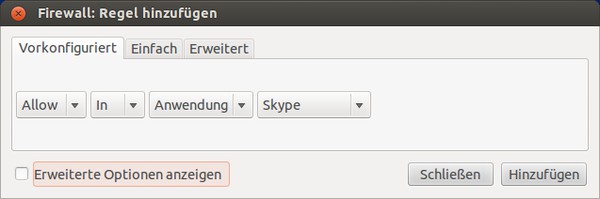
Under "pre-configured", you can configure Firewall rules for some Standard applications and Services. In this example, incoming Connections from "Skype" are accepted generally.
"Easy": (1) network traffic blocking (deny) / allow (allow) (2), outbound (out) / inbound (in) traffic (3) type of Protocol: UDP, TCP, both (both) (4) Port number / Service. In this example, outbound TCP and UDP blocked packets via Port 870.
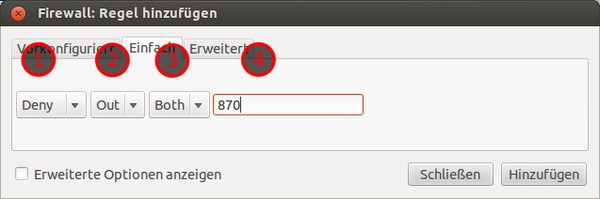
"Easy": (1) network traffic blocking (deny) / allow (allow) (2), outbound (out) / inbound (in) traffic (3) type of Protocol: UDP, TCP, both (both) (4) Port number / Service. In this example, outbound TCP and UDP blocked packets via Port 870.
(1) click on "show Advanced options" is selected two additional fields: (2) Here you define a number for the respective rule. (3) Here, you configure whether the Firewall actions will be logged under this rule.
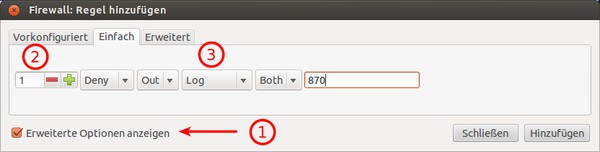
(1) click on "show Advanced options" is selected two additional fields: (2) Here you define a number for the respective rule. (3) Here, you configure whether the Firewall actions will be logged under this rule.
Special Firewall rules set with the UFW under "Advanced". In the example, all TCP will be rejected packets are to be transmitted via the Port 21 to the IP address 80.19.92.11 via one of the Ports from 17 to 14 (Port-Range with a PortA:PortB) to the home computer.
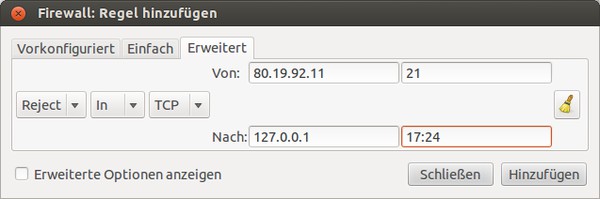
Special Firewall rules set with the UFW under "Advanced". In the example, all TCP will be rejected packets are to be transmitted via the Port 21 to the IP address 80.19.92.11 via one of the Ports from 17 to 14 (Port-Range with a PortA:PortB) to the home computer.