Step 1: make lightning in Gimp create
- Select the free selection tool, and highlight some of the elongated areas. Now click on "edit" and select "fill With foreground color" to dye the highlighted pieces black. In our picture gallery we show you how the look should be.
- Click "selection" to "Nothing", to select the entire image. You disguise the edges of your selection: Choose under "Filter" and "blur" the Tool "Gaussian blur". You set both values to "100 px" and click "Ok".
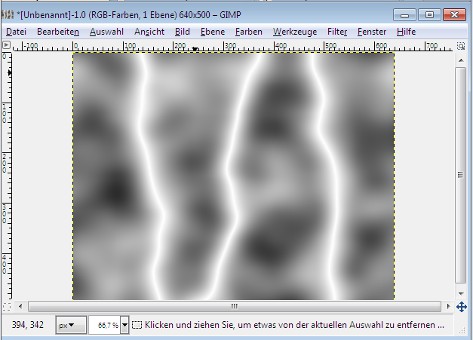
- In the menu, click "Filter" to "Render". Then select "clouds" and the entry "difference clouds". It is a new window, which you confirm with "Ok" opens.
- Now click in the menu "colors" is set to "Invert". Now you should be able to the statures of their flashes to detect.
- You remove the shades of grey to your flashes: select under "colors" select "values". The value of the filter shows the color distribution of the photos. On the left you can see the Black and to the right of the white portion of the image. Now slide the small black triangle under the graph to the right, until only the white lines are visible. Confirm the Changes with "Ok", it should be your image area almost black.
- Next, highlight your flashes, by clicking in the menu "colors" to the entry "color to transparency". Select black color and click "Ok".

Step 2: Gimp-flashes Refine and color
- You create "layer" > "New layer" black Background. To do this, choose "foreground color" and click "Ok". Select in the layers window a new layer and drag it to the bottom. Your flashes should now be visible on a black Background.
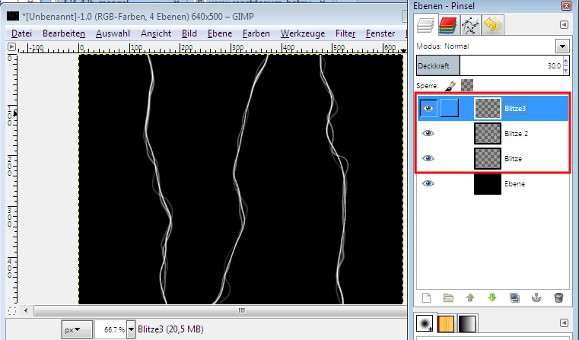
- Select the layer with the Flashes and create two copies. This is very simple with the key combinations [Ctrl] + [C] twice [Ctrl] + [V]. Rename the new levels so that they can find in the next steps to cope.
- Select the first copied flash level. Click "Filter" and "Distort" on the "Iwarp". In the preview image, then drag with the mouse your flashes. You make some zig-zag movements to make the lightning look more natural. Click "Ok" when you are satisfied with the Changes.
- You put in the layers window, the opacity of the layer to 60%. Repeat step 3 for the second copied layer. The opacity, set this to 30%.
- They combine all three flash-Eebenen by clicking with the right mouse button on the top level. Select the entry "down to unite". Repeat the step, so that only a flash-level and the Background are present.
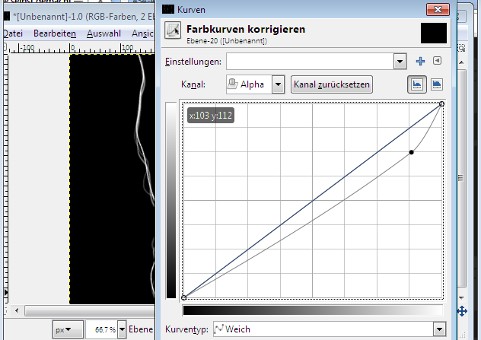
- In the menu, select "colors" entry "curves". A new window will open. Set as channel "Alpha" and adjust the curve as in the pictures gallery to.
- You will have to copy the flash level again with [Ctrl] + [C] and [Ctrl] + [V]. Then select "Filter" and "blur" the "Gaussian blur". Set the values this Time on "30 px". You can repeat this step as often as you like until you are with the degree of their flashes satisfied.
- Now click on "image" and select paste the entry "image" to combine all the levels. Under "colors" and "color balance" you can tones of your flashes. Just play a little with the sliders until you like the result.
- The spectacle of nature in other photos to transfer, you need to the objects, cut, and copy.
Latest Videos
Drag the "Gimp-Lasso" several jagged lines across the image. Attention: you created the last line, you need to click on the start point, to select the area. The black edges are later on your flashes.

Drag the "Gimp-Lasso" several jagged lines across the image. Attention: you created the last line, you need to click on the start point, to select the area. The black edges are later on your flashes.
Insert the Filter and invert the colors. Now, you should realize your flashes already.

Insert the Filter and invert the colors. Now, you should realize your flashes already.
Slide the triangles in this Position. So only your white lightning should see.

Slide the triangles in this Position. So only your white lightning should see.
You should now have three layers, their opacity individually. Combine the effects with the Iwarp Filter to create jagged lines.

You should now have three layers, their opacity individually. Combine the effects with the Iwarp Filter to create jagged lines.
The color curve should look something like this. You draw the line with your mouse in the desired Position. So you weaken your flashes at the edges of something.

The color curve should look something like this. You draw the line with your mouse in the desired Position. So you weaken your flashes at the edges of something.
You miss your Flashing finally, different colors, the digital spectacle of nature perfectly.

You miss your Flashing finally, different colors, the digital spectacle of nature perfectly.


