Each App wants it the other way - Where your Freenet-set up Email
The procedure depends on which Android App you use on your Smartphone for E-Mail traffic. We will show you on the example of the popular E-Mail Clients "Kaiten mail", and the default Mail App from HTC Phones how to make your Freenet e-mail set up.
- Kaiten Email: Click on the main menu, the menu button and select "add account". As the E-Mail address enter your full Freenet Email, password is your normal Freenet password. Then click on "Manual setup" and choose in the next step, "IMAP account".
- HTC Mail App: When you Start you will be asked for the email service provider. Here, select "Other (POP3/IMAP)". As an E-Mail address and password, you use your normal Freenet data. After that, click on "Manual setup" and select the very top as the Protocol "IMAP".
The data for the IMAP account - you will need This for Freenet
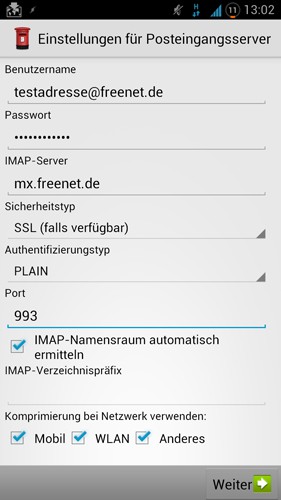
Now you need the data for the incoming server. Depending on the Android App, the fields are named, where appropriate, different or differently arranged.
- E-Mail address: your complete Freenet address
- User name: Again your complete Freenet address (with "@freenet.de" at the end)
- Password/Password: Your Freenet Password
- IMAP Server: mx.freenet.de
- Security type: SSL or "SSL (if available)"
- (Server)Port: 993
Freenet-Mail setup on Android
For the outgoing server use the following data and set the hook at "registration":
- User Name: Your Freenet E-Mail Address
- Password: Your Freenet Password
- SMTP Server: mx.freenet.de
- Security type: SSL or "SSL (if available)"
- Server port: 465
Finally, you choose the frequency of your E-Mails should be retrieved, and confirm all the data. Now you have set up your Freenet e-mail on the Android Smartphone.


