After Effects Tutorial: Create a Film-composition
At the very beginning, you need a base to build upon later: A composition. This includes all the Videos that you want to add to the Film, including all the settings and effects.
- After Effects shows you the Start-up welcome window will. Click on "New composition".
- You now give the composition a name.
- Select "default:" a resolution to have your Film later. You can also adjust the resolution manually by changing the Pixel size in the "width" and "height". In this example, we'll use 1280 x 720 pixels for HD resolution.
- Now, set the frame rate, which determines how many images are displayed per second. A value of 25 is recommended.
- To enter, ultimately, under the "duration:" the time to include your Film in the end. You can adjust this value later, but still. Confirm with "OK".

AE: composition set up
After Effects Tutorial: Adding and Adjusting images, Videos, and music
After Effects offers you the possibility of a wide variety of media to add formats to your movie.
- On the left side of the program window you will find the column "project". There should be, so far, only your newly created composition.
- To add further Footage, you can now either click your Video in the Windows Explorer and drag it via Drag&Drop in this column. Or go to "file" then "Import" and ultimately the "file..." and select in the window that appears, your recording.
- Their media are now available in the project, but not yet in the composition. Drag your Video via Drag&Drop from the "project"column in your composition at the bottom of the window.
- Your Video will now appear in the middle, to see where a black Square was. It may not fill the entire size or overlaps at the edges. To do this, click on one of the gray vertices of the movie and you pull this so that the Video fills as closely as possible to the area.
- If the Video is very distorted, you have chosen at the beginning may be a false resolution of the composition. Click "composition" then "composition settings...". Here you can now adjust the resolution and also the duration of the composition change.

Add Footage
Video cut in After Effects
You can trim movies in After Effects in the right place, or duplicate. For this, you have a bar at the bottom of the window, the time.
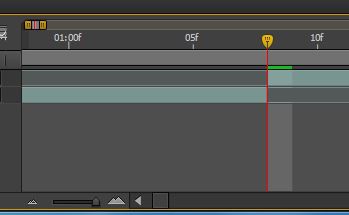
- In the Video and go back, drag the red vertical line to the left or to the right. In the time bar continue to zoom in, click the large, filled-in mount at the bottom, like the picture recognizable. You can zoom in to individual images.
- If you are at the desired point in the Video, press the key combination [CTRL] + [Shift] + [D] at the same time, to cut the Video at the current point. You then have two levels, with the ends at exactly this point, and the other starts at this.
- Either you delete a level or leave the Video at a later date at this point, start by clicking on the upper level and move to the right.
Video cut in After Effects
RAM preview and audio playback
Surely, you do not want to render your project constantly to see what you have done so far. Prior to a preview, proceed as follows.
- You want to give the current image of the Video without sound, then press the spacebar. Press it again stops the Video.
- Just play the audio, press the [,] button.
- If you want to give the image and sound back on, press the [0] on the numeric keypad. After Effects will then pre-render the entire Video into memory. You can also view before a part of it, simply press the space bar to RAM preview begins.
- All preview options can also be displayed in an Extra window. To do this, click on the tab "window" and put a checkmark in front of "preview". There, you can start the RAM preview, and other settings, as the adjacent image can be found.
- Generally speaking, sections of which have already been renders for the preview pre-bar have a thin green bar above the time. This run then without having to wait in real speed.

Preview settings for Videos
Video finish render process
Finally, we will show you how to render your movie, so as a movie file, save it, burn it to a DVD.
- To do this, select your composition and click "composition" then "add To Render queue". Alternatively, press the key combination [CTRL] + [M].
- Instead of the timeline, the render list with your will now appear lined up in a row composition.
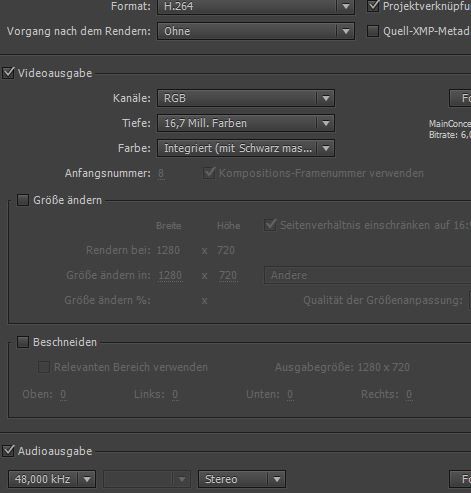
- Now you should change the output format. To do this, click on Best on the yellow "Loss". In the new window that appears, select the Format to H. 264. You can of course also choose a different Format. This differs specifically according to the purpose of use. Also, you have to remember to put a check in the "audio output". Now click on "Ok".
- You can change the location and name by clicking on the yellow Text for "Save to:".
- Now you can right click on "render". The process you can then interrupt It later to continue or stop, so the movie is saved up to the current point. Tip: check the shift lock, or Caps Lock, so that no preview image is displayed. This speeds up the rendering process a little. When the Video is ready to render, you hear a small Sound.
Recommended Render Settings
In this practice tip we use Adobe After Effects CS6. If you with the Basics to cope, then we recommend you other practical tips to After Effects, for example, as you slow to create or add effects. Since video editing is very memory-hungry, interested in you, maybe, also, your RAM memory optimize.


